เป็นปัญหาและคำถามเกิดขึ้นมากมาย เมื่อสาวก ASP.NET MVC จะทำรายงาน เนื่องจากเจ้า ASP.NET MVC View Engine อย่าง Razor นั้นไม่รองรับ ReportViewer Control เพราะเจ้านี่เป็น asp.net server control นั้นเอง แต่ก็ไม่ได้เป็นปัญหาโลกแตกไม่มีคำตอบและทางแก้ไขซะทีเดียวไป
โดยปกติแล้วเราสร้างรายงานได้โดยวิธีใดบ้าง
1. ใช้ Reporting Tool อย่างเช่น Report Client (rdlc), Reporting Services (rdl), Crystal Report (rpt), 3rd Party Report tool
2. Custom report อาจจะเป็นการสร้าง report ขึ้นมาเองโดยวิธีการนึง อย่างเช่น การสร้าง PDF, Excel, Word, Image, HTML Report เป็นต้น
ในกรณีที่ต้องใช้ reporting tool ในข้อที่ 1 หากเป็นโลกของ ASP.NET Web Form ก็จะสามารถใช้งานได้เพราะทำมาให้รองรับกัน เพราะมีการใช้งาน ViewState บน webForm
แต่สำหรับโลกของ ASP.NET MVC ที่ไม่ได้ทำงานบน Web Form นั้น จะไม่สามารถเรียก report ออกมาแสดงผลได้ตรง ๆ ในบทความนี้จะขอยกตัวอย่างการใช้งาน RDLC (Reporting Client) ผ่านตัว ReporViewer พอเป็นแนวทางในการนำไปประยุกต์ใช้งาน
Software Required
- Visual Studio 11 หรือ Visual Studio 2010 + Service Pack 1
- ASP.NET MVC 3 with Update Toolkit
- SQL Server 2005 or later
- Northwind Database
การเรียก reporting service มาใช้งานใน MVC เท่าที่ทดสอบมาจะมีอยู่ 3 วิธี
1. สร้าง web site สำหรับ report แยกออกไปต่างหาก และส่ง parameter ผ่านทาง url
2. สร้าง ReportViewer object ขึ้นใน controller แล้วสั่งให้ render ออกเป็นไฟล์รูปแบบต่างๆที่รองรับ ไปแสดงผลหรือส่งให้ user download ไปดู
3. ใช้ aspx + iFrame + Route ภายใน MVC Project ซึ่งเป็นวิธีที่ผมจะมาแนะนำ เพราะโดยรวมแล้วมีข้อดีมากกว่า 2 วิธีข้างต้น
พื้นฐานความเข้าใจก่อนไปรื้อโค้ดมาคุย
1. จำไว้เสมอพวก asp.net server control ที่เคยใช้งานทั้งหมด จะเอามาใช้ทำงานบน view ของ MVC ไม่ได้ (ไม่ต้องพยายาม)
2. URL ปกติที่เคยใช้เรียกหน้า aspx ก็ให้ลืมไปซะครับ MVC ไม่รู้จักโดยกำเนิด เช่น http://www.test.com/reports/viewreport.aspx?id=3333 ต้องไปเพิ่ม Route ให้รู้จัก โดยกำหนดแทนที่เช่นเมื่อเจอ “Reports/View” ใน url ให้วิ่งไปหา “/reports/viewreport.aspx” เป็นต้น
3. เราจะใช้ชีวิตอยู่กับ javascript, jquery, html, css, json อย่างเลี่ยงไม่ได้
4. โดยค่าพื้นฐานของ software ที่มีไม่สามารถทำงานร่วมกัน อาศัยต้องแก้ไขประยุกต์ให้ทำงานได้ยืดหยุ่นขึ้น (เจอประจำ)
ผลลัพธ์ของ DEMO นี้
เรามาดูหน้าตาโปรแกรมหลังกด F5 กันเลยดีกว่า
ใส่ parameter เข้าไป แล้วกด “Show Report”
Report ก็แสดงผลออกมาทันใด ไม่มีการ Refresh หน้าจอซะด้วย ว้าวว
การทำงานของโปรแกรม
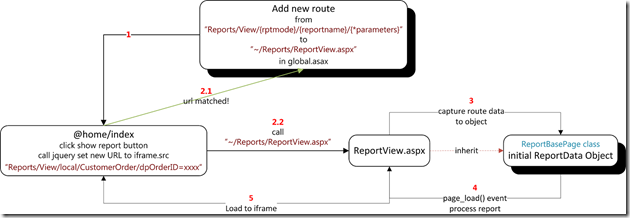
1. มีการเพิ่ม route ใหม่ให้ตัว MVC รู้จักกับ reportview.aspx (reportviewer)
2. ใน Home/Index view มีการเรียกใช้ iframe เพื่อแสดงผล report โดยเมื่อรับ OrderID เข้ามาและกด Show Report Button แล้วก็จะสร้าง url จาก paraeter และ set ค่าให้ iframe เพื่อเรียกหน้า aspx มาทำงาน
2.1 เมื่อ iframe มีการส่ง request ตาม url ที่ได้ set ให้ก็จะถูกส่งกลับไปที่ server ก็จะไปเข้ากับ route pattern ที่ได้กำหนดไว้ในข้อ 1
2.2 ตัว MVC ก็จะวิ่งไปเรียก reportview.aspx ขึ้นมาทำงาน
3. ในตัว reportview.aspx ได้ทำการ inherit มาจาก RpeortBasePage Class ที่ได้สร้างขึ้นเพื่อช่วยในการสร้าง reportdata object ไว้ใช้งานง่ายขึ้น
4. เสร็จแล้วก็จะเข้า Page_Load Event ของ reportview.aspx ปกติ ซึ่งเราจะมี DBQuery class ไว้ช่วยในการติดต่อ database และ execute เพื่อนำ DataSet ไปส่งให้ ReportViewer Control เพื่อแสดงผลบนหน้า aspx
5. เพื่อ ReportView.aspx ทำงานจบโปรเซสแล้วก้จะไปแสดงผลอยู่บน iframe ของ Index View
*** อ่านไม่เข้าไปข้ามไปก่อน เดี๋ยวมาดูใหม่ตอนจบ
มาเริ่มเขียนโค้ดกัน
1. สร้าง MVC 3 Project
เปิด VS ขึ้นมาก็ Create New Project
เมื่อกด OK แล้วจะมี dialog ขึ้นทำตามลำดับ
เมื่อกด OK แล้วก็จะได้ MVCReport Project
ให้สร้าง Folder ภายในโดยกด Right-Click –> Add –> New Folder โดยตั้งชื่อว่า “Reports” จะได้ผลลัพธ์ตามมภาพ
2. สร้าง Client Report ไว้ทำการทดสอบ
คลิ๊กขวาที่ Reports Folder –> Add –> New Item..
เราจะสร้าง Report ด้วย Wizard ทำตามลำดับจากนั้นกด OK จะขึ้น Dialog ด้านล่าง
เพื่อสร้าง Connection String สำหรับติดต่อไปเอา Schema จาก Stored Procedure มาสร้างรายงาน
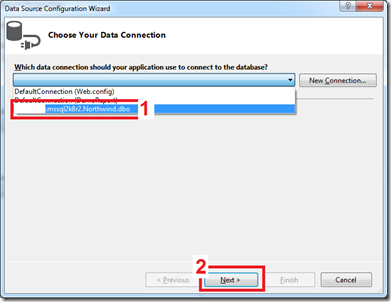
ทำตามลำดับ กด Continue จะได้ dialog สำหรับติดต่อ Database
เมื่อสร้าง Connection String เสร็จแล้ว กด Next จะได้หน้าต่างสำหรับเลือก Schema จาก Database ของ Northwind
ซึ่งผมจะใช้ Stored Procedure ที่ชื่อ CustOrderDetail ในการทำรายงาน ตามรูปด้านล่าง
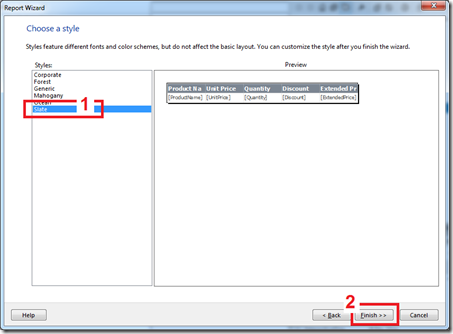
เลือก item ทั้งหมดใน 1 แล้วลากไป 2 จากนั้น uncheck SUM ออกทุก item แล้วกด Next
เมื่อกด Finish > > ก็จะได้ Report เข้ามาใน MVC Project ตามรูปด้านล่างนี้
3. สร้าง Report Framework เอาไว้ใช้งาน
1. Report Model เพื่อใช้ในเก็บข้อมูลต่าง ๆ ที่ส่งมาจาก MVC
1.1 ทำการ คลิ๊กขวาที่ Models Folder –> Add –> Class –> ใส่ชื่อ ReportModel
1.2 เมื่อได้ ReportModel.cs แล้วให้ลบ code ข้างในทิ้งให้หมด จากนั้น copy code ด้านล่างไปวางแทนที่
|
using System; namespace DemoReport.Models public class Parameter |
2. สร้าง ReportBasePage class สำหรับจัดการ RouteData นำมาสร้างเป็น ReportData object
2.1 ไปที่ Solution Explorer-> Reports Folder –> Right click –> Add –> Class –> ตั้งชื่อว่า ReportBasePage
2.2 จะได้ ReportBasePage.cs และให้ลบโค้ดในนั้นทิ้งทั้งหมด แล้วนำ Code ด้านล่างไปวางแทนที่
|
using System; namespace DemoReport.Reports protected override void OnInit(EventArgs e) } private void CaptureRouteData<T>(T obj) where T : System.Web.Routing.RouteData } |
3. สร้าง DAL สำหรับ Report ใช้งาน
3.1 ไปที่ Solution Explorer –> DemoReport Project –> Right Click –> Add –> New Folder ตั้งชื่อว่า DAL
3.2 จากนั้นเลือกที่ DAL Folder –> Right click –> Add –> Class ตั้งชื่อว่า DBQuery
|
using System; namespace DemoReport.DAL public DBQuery() { } public DataSet ExecuteDS(string queryName, bool isProcedure, List<Parameter> parameters) //assign value to all parameter by name } |
4. สร้าง ReportView Page
4.1 ให้เพิ่มหน้า asp.net web form ลงไปใน Reports Folder ตั้งชื่อว่า ReportView.aspx
4.2 จากนั้นเปิดไฟล์ ReportView.aspx ขึ้นมาแล้วลบออกทั้งหมดใส่ code นี้ลงไปแทน
|
<%@ Page Language="C#" AutoEventWireup="true" CodeBehind="ReportView.aspx.cs" Inherits="DemoReport.Reports.ReportView" <%@ Register Assembly="Microsoft.ReportViewer.WebForms, Version=11.0.0.0, Culture=neutral, PublicKeyToken=89845dcd8080cc91" |
ส่วนที่ทำ highlight ไว้ คือโค้ดที่เรียก ReportViewer Control มาใช้งานโดยทำงานภายใต้ UpdatePanel อีกที ที่ลืมไม่ได้คือ ScriptManager ต้องระบุ EnablePartialRendering=true ด้วย
4.3 เปิด ReportView.aspx.cs ขึ้นมาแล้วลบ code ทิ้งทั้งหมดจากนั้นวาง code ข้างล่างนี้ลงไปแทนที่
โดยโค้ดด้านล่างจะทำการใส่ parameter และ datasource name รวมไปถึงส่ง dataset เข้าไปใน report ให้เองอัตโนมัติ
|
using System; namespace DemoReport.Reports //Execute Data Result //Render Report private void RenderReport(DataSet ds, Models.ReportData reportData) // Reset report properties. // Clear out any previous datasources. //Set report mode for local processing. //Validate report source //Set report path // Load the dataSource. // Refresh the ReportViewer } |
4.4 ให้ทำการ Add Assembly ตัวที่ชือ Microsoft.ReportViewer.WebForms version 11.0.0 ตามรูปนี้เข้ามาในโปรเจ็ค
4.5 แก้ไข web.config (ตัวนอก folder) โดยเราจะต้องเพิ่มส่วนของ report config ให้ IIS รู้จัก
โดยมองหา <system.webServer> …… </system.webServer> แล้ววางส่วนที่ highlight ไว้ในตำแหน่งตามด้านล่าง
|
<system.webServer> |
ต่อมามองหา <appSettings> …. </appSettings> แล้วเพิ่ม config ด้านล่างนี้ลงไป ซึ่งเอาไว้ใช้ในการจับคู่ Report Name กับ Stored Procedure / Query ไว้ที่นี่
|
<appSettings> |
ให้ทดสอบ build และ run project ด้วยการกด F5 จะได้ผลลัพธ์ด้านล่าง เนื่องจากยังไม่ได้สร้าง Controller / Action / View ของ Default Route ไว้จึงเกิด error ขึ้น
4. เรียกใช้งาน Report Framework ที่สร้างขึ้น
1. กำหนดค่า Route ใน Global.asax
ให้ MVC เข้าใจว่าว่าเจอ url patern นี้ “Reports/View/{rpmode}/{reportname}/{*parameter}” ให้ไปเรียก "~/Reports/ReportView.aspx” ตาม virtual path ขึ้นมาทำงานโดย
{rpmode} คือตัวแปรที่ผมกำหนดไว้ใช้งานเพื่อบอกว่าเป็น client report หรือ reporting service
{reportname} คือตัวแปรชือ report ที่เราต้องการจะให้โหลดเข้าไปทำงานใน reportviewer control
{*parameter} คือตัวแปร parameter ที่จะส่งไปทำงานใน ReportViewer โดยจะโดน mvc attach เข้าไปเป็นตัวแปร RouteData ในระบบกำหนดเป็น 2 กลุ่มคือ
- กลุ่ม data parameter ไว้สำหรับส่งไปใส่ใน Stored Procedure โดยผมกำหนดให้มี prefix dp* เช่น dpOrderID
- กลุ่ม report parameter ไว้สำหรับส่งเข้าไปใน report ตรงๆ จะใช้ prefix rp* เช่น rpReportName
- ## ให้มองหาไฟล์ Global.asax.cs ใน solution explorer ขึ่นมาแก้ไข มองหาเมดธอดที่ชื่อ RegisterRoutes() แล้วเพิ่มโค้ดที่ highlight ข้างล่างลงไป
|
public static void RegisterRoutes(RouteCollection routes) routes.MapRoute( |
2. สร้าง Home Controller และ View
ไปที่ Solution Explorer –> Controllers folder –> Right click –> Add –> Controller..
จะได้หน้าต่างด้านล่าง ตั้งชื่อ HomeController แล้วกด Add
ให้แก้ไข Action Index() โดยเพิ่มโค้ดลงไปตามนี้
|
public ActionResult Index() |
*** ใช้เป็น url สำหรับยิง request ไปยัง report page
จากนั้นเลื่อน cursor ไปคลิ๊กบริเวณ Index() แล้วกด Right Click –> Add View..
แล้วใส่ค่าตามรูปด้านล่างนี้ และกด Add
ก็จะได้ Index View มาใช้งาน ต่อไปเราจะแก้ไขหน้า Index View ให้รับค่า OrderID และมี button สำหรับสั่งงานให้ไปเรียก ReportView.aspx มาทำงานใน iframe
โค้ดสำหรับ Index.cshtml View
ViewBag.Title = "Index";
Layout = "~/Views/Shared/_Layout.cshtml";
}
<h2>Hello MVC Report Solution</h2>
<script type="text/javascript">
$('#ShowReport').live('click', function () {
var url = $('#hdUrl').val();
var url = url + "dpOrderID=" + $('#orderid').val();
$('#ifrReport').attr('src', url);
});
</script>
<form>
<input id="hdUrl" type="hidden" value="@ViewData["reportUrl"]" />
<div style="height: 25px">
<label>Fill Order ID:</label>
<input id="orderid" type="text" required="required" placeholder="Order ID" value="10248" />
<button type="button" id="ShowReport" title="Show Report" >Show Report</button>
</div>
<iframe src="" id="ifrReport" style="width: 100%; height: 500px;" frameborder="0" hspace="0" vspace="0" marginheight="0" marginwidth="0"></iframe>
</form>
อธิบายโค้ดในหน้า Index.cshtml ด้านบน
<script type=”text/javascript”> …….
เราจะใช้ jqeury ทำการดัก event click ของ <button.ShowReport เมื่อมีการกดปุ่ม
ให้เอาค่าจาก <hidden.hdUrl ออกมาใช้งาน ซึ่งส่งค่ามาใส่ใน value=’@ViewData[“reportUrl”]’
มาแปะ dpOrderID พร้อมค่าจาก input.orderid เข้าไป
และส่งให้ set ค่า url ให้กับ <iframe.ifrReport โดยกำหนด src = url ที่สร้างมาได้
เจ้า iframe ก็จะสร้าง request ส่งไปยัง server ให้เราเอง แค่นี้ก็เป็นการเรียกหน้า ReportView.Aspx แล้วครับ
เมื่อจบ step ลองย้อนกลับไปอ่าน flow diagram ด้านบนอีกครั้งก็จะเข้าใจการทำงานเพิ่มขึ้นครับ
สรุปทิ้งท้าย
มาถึงช่วงสุดท้าย จากตัวอย่างที่ได้ทำ demo ให้ดูไปนั้น ยังไม่สามารถรองรับ Reporting Services, Crystal Report ได้ ต้องปรับโค้ดส่วน Report Framework อีกนิดหน่อย แต่ก็พอเป็นแนวทางให้ทุกคนที่ยังติดปัญหาในการสร้าง report กับตัว MVC อยู่ได้บ้าง และได้เข้าใจการทำงานของ MVC มากขึ้นอีก ซึ่งมีความรู้แฝงอยู่ในบทความนี้มากมาย หวังว่าจะเป็นประโยชน์ในการทำงานครับ
Demo Source Code
http://dl.dropbox.com/u/34809954/MVCReport.zip
*อย่าลืมตามไปแก้ connection string ใน web.config ให้ชี้ไปที่ sql server ของตัวเอง
** ใน zip จะมี northwind_db_script.sql ให้นำไปสร้าง database กรณีที่ไม่มี database ในเครื่อง
About Me:
Chalermpon Areepong : Nine (นาย)
Microsoft MVP Thailand ASP.NET
ASP.NET & MVC Developers Thailand Group : http://www.facebook.com/groups/MVCTHAIDEV/
Greatfriends.biz Community Leader : http://greatfriends.biz
Email : nine_biz-talk.net at hotmail dot com
Blog : https://nine69.wordpress.com


thanks and love you MS MVP P’Nine
Comment by ชาณุพล เพิ่มพูล — 05/09/2012 @ 4:34 pm
สอบถามนิดนึงครับ ผม set iis แล้ว พอรันผ่าน ie พิมพ์ี url ตามนี้ http://localhost/MVCDemoReport มันก็จะแสดงผลปกติ แต่แล้วพอกดปุ่ม Show Report ตรง iFrame มันจะขึ้น error ว่า The webpage cannot be found ไม่ทราบว่า ผมต้องแก้ไขตรงส่วนไหนครับ
Comment by Jittagonnoi Satonggan — 29/04/2013 @ 12:17 pm